Unless you’re brand new to the world of software or you’ve been living under a rock, you’ll have heard of Docker and the concept of “containerisation”. But what is Docker and why is it such a big deal?
By the end of this article you should:
- have a basic understanding of Docker’s fundamentals
- know how to create a Docker image
- have a basic container up and running locally
The basics
At its most simple level, Docker is a tool that allows you to run applications in a replicable, isolated environment. Using Docker, an application will always run in the same environment, so there won’t be inconsistencies or issues when the application runs on different computers or servers.
It also makes it really easy to run other people’s applications. You can simply pull a Docker image and spin up the application with one command. Everything that the application depends on will automatically be configured for you.
Docker images
A Docker image is a template that can be used to build an environment. It’s essentially a snapshot of what the environment consists of and the commands that need to be run in order to configure it. An image will include the operating system and the application code bundled together in a format that can easily be shared.
Dockerfile
You can create Docker images using a Dockerfile. A Dockerfile is a text document that defines all of the tasks that need to be carried out in order to build the image. These could be things like installing an OS, copying source code, installing dependencies etc.
Once you have defined a Dockerfile, you can build it and you’ll have a Docker image.
Docker containers
A Docker image becomes a container at runtime. It is the running instance of an image. A container will run the same on any system that has the Docker engine installed, because the image it is based on has configured everything it could possibly need.
Let’s try this
Note - I’m using MacOS and a unix based terminal. If you’re using windows, some of the CLI commands used in this tutorial may not work on your system.
The first thing we need to do is install the Docker engine on your computer. The easiest way to do this is to download Docker Desktop (available on both Windows and Mac).
Once you’ve installed Docker desktop, you should have access to the Docker CLI. (Make sure Docker desktop is also running on your machine or some commands won’t work).
You can check if Docker CLI is installed by checking the version in the terminal:
docker -v
> Docker version 19.03.12, build 48a66213fe
Now that we have Docker installed, we’re going to create a really simple Docker container that runs a JavaScript script to print “Hello World!” using Node.js.
There are four steps to this:
- Create the JS script
- Create a Dockerfile
- Build the Docker image
- Run the Docker container
Step 1 - JavaScript
To begin with, create a new directory for your application:
mkdir hello-worldThen use the cd command to navigate in to your new directory:
cd hello-worldNext, we’re going to create an index.js file. We will use the touch command which will create an empty file with the name we specify:
touch index.jsNext, let’s open our code editor (I use Visual Studio Code but any editor will work e.g. Sublime Text, Atom) or a CLI editor like Vim.
Open the index.js in your editor and insert the following script:
(function () {
  console.log("Hello World!");
})();
The code that we’ve written is an IIFE (pronounced “iffy”). That’s short for immediately invoked function expression. It’s a function that will get called immediately when the script is run. Without using an “iffy” we would need to explicitly declare and then call a function like this:
function helloWorld() {
  console.log("Hello World!");
}

helloWorld();
There’s no difference in performance between the two approaches - the IIFE is just less code to write!
Step 2 - Dockerfile
Next we’re going to create a Dockerfile:
touch DockerfileOpen the Dockerfile in your editor and let’s start configuring the image.
The first thing we need to do is define the parent image. A parent image is the Docker image that yours will be built on top of. Each line of your Dockerfile will modify the parent image. We set the parent image using the FROM command (docs).
For this example, we’re going to use one of the official Node images as a parent image. Specifically we’re going to use the node:14-alpine image. The node part refers to the image name, the :14-alpine refers to the tag of the image we’re going to use. In this case we are using a Node v14 image built on the alpine base image. Alpine Linux is a super lightweight version of linux that has very little pre-installed so is a very small image in terms of size. We’re not doing anything fancy so this will work perfectly for us.
You can see more of the official Node Docker images at the node.js page in the Docker hub.
Let’s build our image using the node:14-alpine parent image.
FROM node:14-alpineNext we’re going to set the working directory for the upcoming commands using the WORKDIR command (docs):
WORKDIR /usr/src/appWe’re then going to copy our index.js file in to the work directory using the COPY command (docs). The first argument is the source path (in this case the current working directory which is represented with .). The second argumuent is the destination path on the image file system. As we’ve set the WORKDIR in the previous step to /usr/src/app, we can again use . to represent /usr/src/app.
COPY . .Finally we’re going to use the ENTRYPOINT command (docs) to run the script:
ENTRYPOINT ["node", "index.js"]Your finished Dockerfile should look like this:
FROM node:14-alpine

WORKDIR /usr/src/app

COPY . .

ENTRYPOINT ["node", "index.js"]
Step 3 - Build Docker Image
Our Docker image is now ready to be built. We can build the image with the following command:
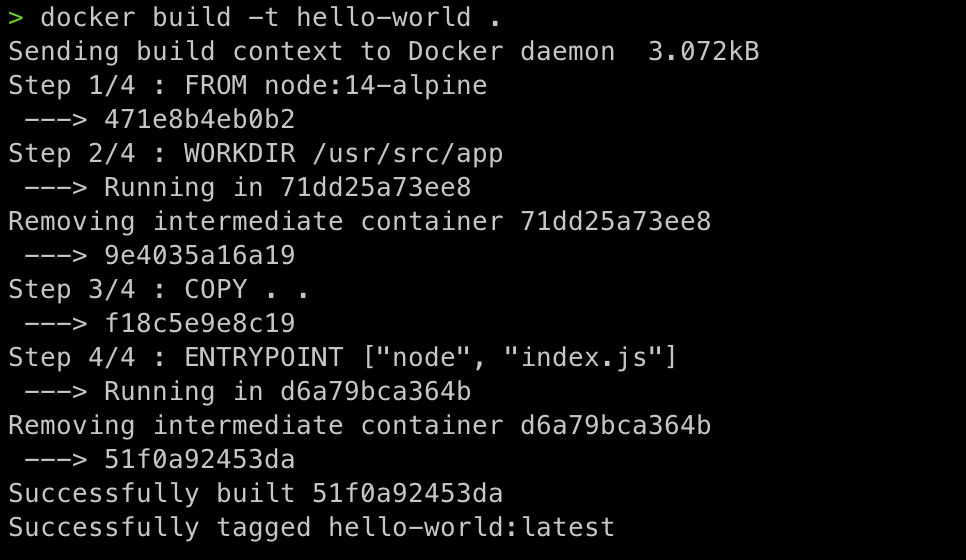
docker build -t hello-world .This command tells Docker to build the image and tag it with a tag hello-world which we can use to refer to the image later. The . at the end tells Docker that the Dockerfile we want to build is in the current working directory.
Once you’ve run the command, you may see Docker downloading the parent image if you don’t have it on your system already, but it shouldn’t take long and you’ll end up with something looking similar to this:
You can see a list of the Docker images you have on your system by running:
docker imagesStep 4 - Run Docker Container
We’ve now built our Docker image and tagged it with hello-world. Running it is as simple as running the command:
docker run hello-world
> Hello World!
You’ll see Hello World! get printed to the console and that’s it! You’ve built your first Docker image and successfully run a Docker container.
Conclusion
You’ve now written your first Dockerfile, built your first Docker image and run your first Docker container. This should be enough to familiarise you with the basic concepts of Docker, but it probably isn’t enough to really illustrate why Docker is useful.
In part 2, we’ll cover more advanced features of Docker and containerise an application ready for deployment! Stay tuned!